حریم خصوصی یک چیز بزرگ در ویندوز ۱۰ میباشد و مایکروسافت نیز سعی دارد کنترل کاربر را در سیستمعامل بهبود بخشد. چرا که شفافیت بیشتری را برای کسانی که آن را نصب میکنند، عرضه میکند.
آخرین بهروزرسانی ویژگیهای ویندوز ۱۰ باعث تغییرات بزرگی در این زمینه شده است. بنابراین در این مرحله، تمامی کاربران مجاز به کنترل چگونگی نصب نرمافزارهای نصبشده بر روی دستگاههای خود و مشاهدهی جزئیات جمعآوری شده توسط سیستمعامل هستند.
زمانی که این ویژگی برای نرمافزارها عرضه میشود، کاربران میتوانند همه چیز را از قسمت پسزمینه نرمافزار ازجمله دسترسی به ایمیل، پیامها، تاریخچهی تماس، اعلانها، میکروفون و چیزهای دیگر را پیکربندی کنند.
و در حال حاضر اساسا دو راه برای مسدود کردن نرمافزارها از انجام این کار وجود دارد. شما میتوانید از برنامه Settings ویندوز ۱۰ استفاده کنید، اغلب در دسترس کاربرانی است که سعی دارند رایانهی شخصی را برای حساب کاربری خود پیکربندی کنند و برای طرفداران IT دربارهی این موضوع، استفاده از Group Policy Editor توصیه میشود.
Settings ویندوز ۱۰
پیکربندی دسترسی نرمافزار به اطلاعات شما چیز سختی نیست، البته اگر بخواهید به برنامه Settings تکیه کنید. در ویندوز ۱۰ میتوانید مجوزهای نرمافزار را در مسیر زیر پیدا کنید:
Settings > Privacy > App permissions
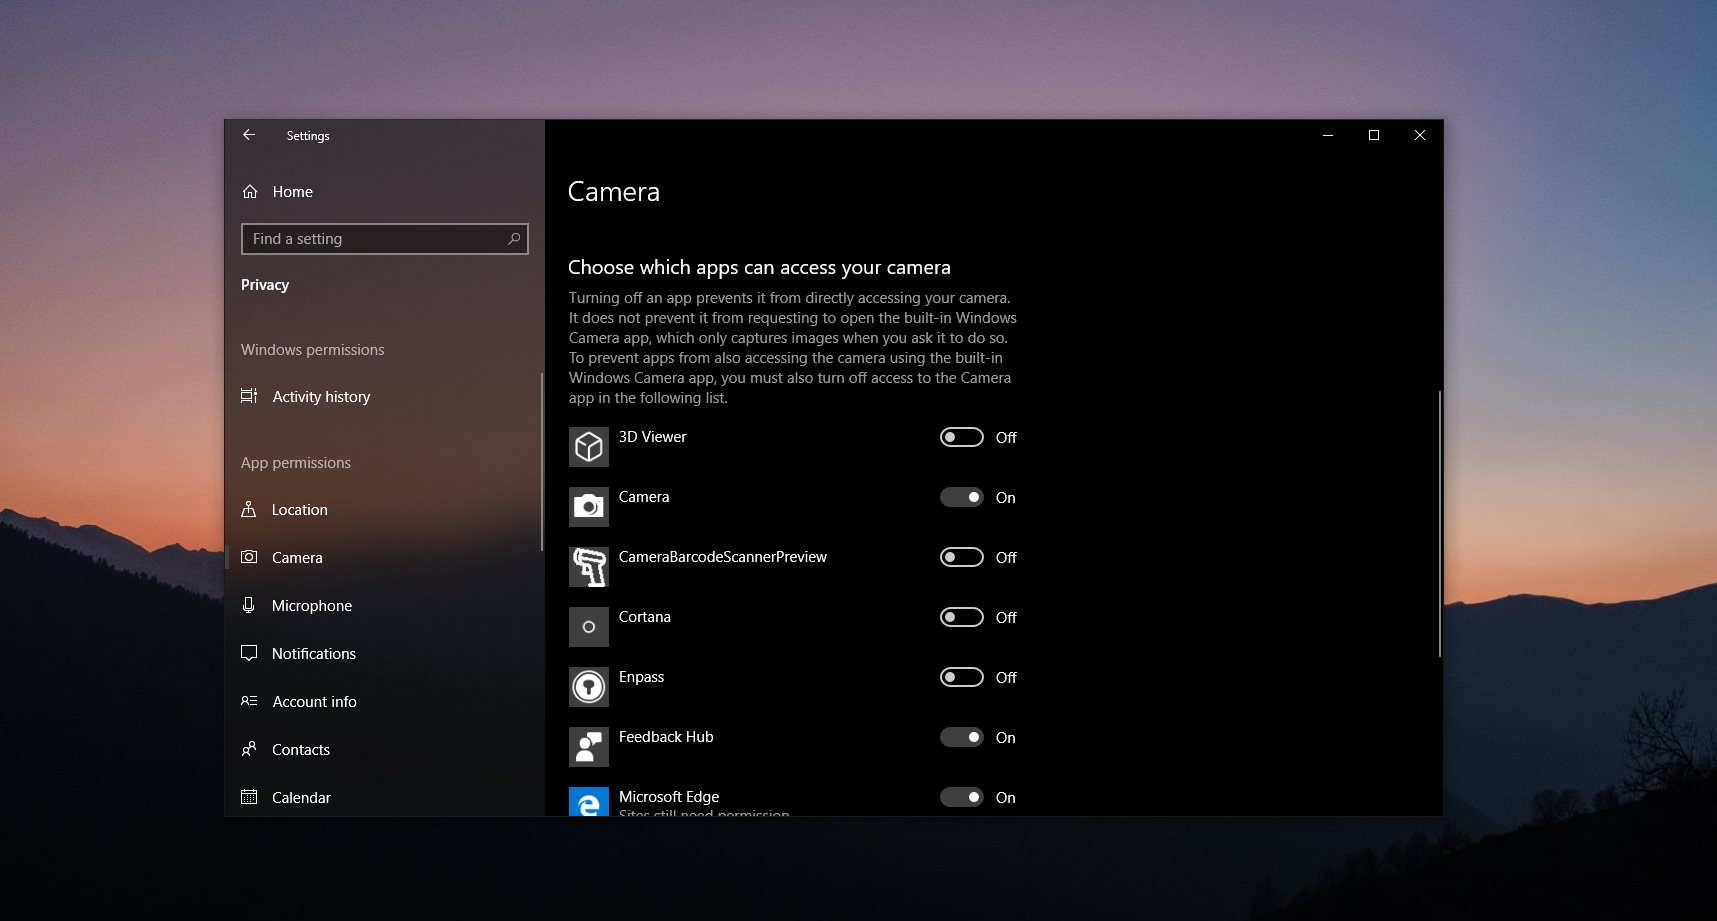
بخشهای اختصاصی برای تمام مجوزها از جمله دسترسی به موقعیت مکانی، دوربین، میکروفون، اعلانها، مخاطبین، تقویم و موارد دیگر وجود دارد.
هر بخش را میتوان بیشتر گسترش داد تا اطلاعات بیشتری را در مورد آن بدانید و سپس با گزینههای اضافی پیکربندی کرد، بهعنوان مثال منوی موقعیت مکانی.
شما میتوانید موقعیت مکانی را فعال یا غیرفعال کنید و همچنین آن را برای نرمافزارهای خاص خاموش کنید و یا حتی مکان پیش فرض خود را برای نرمافزارها و سرویسهایی که نمیتوانند موقعیت مکانی شما را دقیقا تشخیص دهند، تنظیم کنید.
به عنوان بخشی از تلاشهای مایکروسافت جهت تامین کنترل حریم خصوصی و ارایه شفافیت افزایش یافته، کاربران نیز مجاز به پاکسازی تاریخچه موقعیت مکانی روی رایانهی شخصی هستند.
Group Policy Editor ویندوز ۱۰
از سوی دیگر، اگر طرفداران IT میخواهند مجوز نرمافزار را برای دستگاههای ویندوز ۱۰ در سازمانهای خود تنظیم کنند، میتوانند از Group Policy Editor استفاده کنند. با تایپ کردن gpedit.msc در منوی استارت برنامهی Group Policy Editor را راهاندازی کنید و سپس به مسیر زیر بروید:
Computer Configuration > Administrative Templates > Windows Components > App Privacy
برای هر یک از بخشهای فوق که در برنامه Settings ویندوز ۱۰مشاهده کردید. سیاستهای اختصاصی نیز وجود دارد، بنابراین شما میتوانید مجوزهای مشابه را از Group Policy Editor پیکربندی کنید.
بهطور پیشفرض این سیاستها بری روی Not Configured تنظیم شدهاند، بنابراین شما باید بر روی آنها را دو بار کلیک کنید تا وضعیت آنها را به Enabled تغییر دهید. گزینههای اضافی برای هر سیاست موجود است و شما میتوانید جهت مسدود کردن یا مجوز دسترسی به اطلاعات خاص آنها را پیکربندی کنید. اما برای قرار دادن کاربران در کنترل نرمافزارهای خاص، شما باید نام نرمافزار را تهیه کنید.
با این حال برای مشخص کردن نام نرمافزار باید نام بسته را برای هر یک از آنها بنویسید. برای انجام این کار با کلیک راست بر روی منوی استارت، ویندوز PowerShell را راهاندازی و دستور زیر را ارسال کنید:
Get-AppPackage
مایکروسافت در مورد این موضوع چنین توضیح میدهد:
اگر این تنظیمات سیاست را غیرفعال کنید یا پیکربندی نکنید، کارمندان در سازمان شما میتوانند تصمیم بگیرند که آیا نرمافزارهای ویندوز میتوانند به اطلاعات حساب کاربری با استفاده از تنظیمات حریم خصوصی بر روی دستگاه دسترسی داشته باشند یا خیر.
یکی از چیزهایی که باید در نظر داشته باشید، این است که وقتی نرمافزارها بسته شوند، سیاستها اعمال میشود. به عبارت دیگر، اگر مجوزهای نرمافزار را با استفاده از این روش تغییر دهید، تا زمانی که نرمافزار یا سیستم مجددا راهاندازی نشود، این سیاستها ذخیره نمیشوند. بنابراین پس از تنظیم سیاستهای جدید، جهت ذخیرهسازی آنها باید سیستم را مجددا راهاندازی کنید.
همهی این سیاستها در ویندوز ۱۰ نسخه ۱۸۰۹ (بهروزرسانی اکتبر ۲۰۱۸) و در سایر نسخههای قبلی ویندوز ۱۰ نیز موجود است.
Privacy is a big thing in Windows 10, and Microsoft itself has tried to improve user controls in the operating system, while also offering more transparency to those who install it.
The latest Windows 10 feature updates have thus brought major changes in this regard, so at this point, all users are allowed to control how apps installed on their devices access their information and to see what details are collected by the operating system.
When it comes to apps themselves, users can configure everything from background apps, access to email, messaging, call history, notifications, microphone, and more.
And right now, there are basically two ways to block apps from doing this. You can use either the Settings app in Windows 10, which comes in handy mostly to home users who are trying to configure the PC for their account, and using the Group Policy Editor, in this case, recommended for IT pros.
Windows 10 Settings
Configuring app access to your data isn’t rocket science if you just want to rely on the Settings app. In Windows 10, you can find app permissions at the following location:
Settings > Privacy > App permissions
There are dedicated sections for all permissions, including for access to the location, camera, microphone, notifications, contact, calendar and more.
Each section can be further expanded to read more information and then to configure with additional options, as it’s the case of the location menu, for instance.
You can enable and disable location, turn off the location for specific apps, and even set a default location for apps and services that can’t detect your location accurately.
As part of Microsoft’s efforts to provide more privacy controls and to offer increased transparency, users are also allowed to clear the location history on the computer.
Windows 10 Group Policy Editor
On the other hand, IT pros who want to configure app permissions for Windows 10 devices in their organizations can rely on the Group Policy Editor. Launch the app by typing gpedit.msc in the Start menu and then navigate to this location:
Computer Configuration > Administrative Templates > Windows Components > App Privacy
There are dedicated policies for each of the aforementioned sections in the Windows 10 Settings app, so you can configure the same permissions from the Group Policy Editor.
By default, these policies are set to Not Configured, so you need to double-click them to change the status to Enabled. Additional options are available for each policy, and you can configure to block or allow access to specific data, but also to put users in control of specific apps, in which case you need to provide the name of the app.
However, in order to specify the name of the app, you’ll have to write down the package name for each of them. To do this, launch a Windows PowerShell by right-clicking the Start menu and send the following command:
Get-AppPackage
“If you disable or do not configure this policy setting, employees in your organization can decide whether Windows apps can access account information by using Settings > Privacy on the device,” Microsoft explains.
One thing that you must keep in mind is that the policies are being applied when the apps are closed. In other words, if you change app permissions using this method, they aren’t saved until the app or the device is restarted. You can thus force a system restart after setting up new policies.
All these policies are available in Windows 10 version 1809 (October 2018 Update), but also in the previous versions of Windows 10.







دیدگاه خود را ثبت کنید
تمایل دارید در گفتگوها شرکت کنید؟در گفتگو ها شرکت کنید.