اگر برای استفاده از اینترنت بر روی گوشی یا لپتاپ خود به وایفای وابسته هستید، احتمالا با مکانهای مرده آشنایی دارید. اما، مکانهای مرده وایفای چیستند؟ در واقع، مکانهای مرده یا همان نقاط کور وایفای نقاطی هستند که در آنها قدرت سیگنال وایفای صفر میشود.
چگونه با ترفندهای ساده نقاط کور وایفای را حذف کنیم؟
نواحی مرده وایفای میتوانند هرجایی باشند. توجه داشته باشید که سیگنال وایفای ضعیف با “ناحیه مرده” فرق میکند. نواحی مرده وایفای مکانهایی هستند که قرار است سیگنالهای وایفای توسط دستگاه وایفای پوشش داده شود اما عملا چنین اتفاقی نمیافتد.
نواحی مرده وایرلس همه جا یافت میشوند بهخصوص در مناطق پرجمعیت. اما هر دلیلی که داشته باشد، در این مقاله میخواهیم چند ترفند فوقالعاده را برای حذف این نقاط بهشما آموزش دهیم.
۱- نواحی مشکلدار را پیدا کنید

قبل از اینکه اقدام بهاز بین بردن نواحی مرده وایفای کنید، خیلی مهم است نواحی مشکلدار را شناسایی کنید. برای این کار هیچ نیازی به نرمافزار ندارید. گوشی را بردارید، به شبکه وایفای وصل شوید و اطراف خانه یا هر مکانی که مدنظرتان است راه بروید. تمام این مدت باید کاملا به علامت سیگنال وایفای که بالای گوشی است توجه کنید. اگر قدرت سیگنال وایفای صفر شد، یعنی اینکه یک ناحیه مرده را کشف کردهاید.
در کنار این کار، میتوانید از اپلیکیشن Wifi Analyzer روی گوشی اندروید استفاده کنید تا اطلاعات کامل و دقیقی در خصوص قدرت سیگنال وایفای بهدست آورید. این اپلیکیشن فرکانس سایر شبکههای اطراف را هم نمایش میدهد.

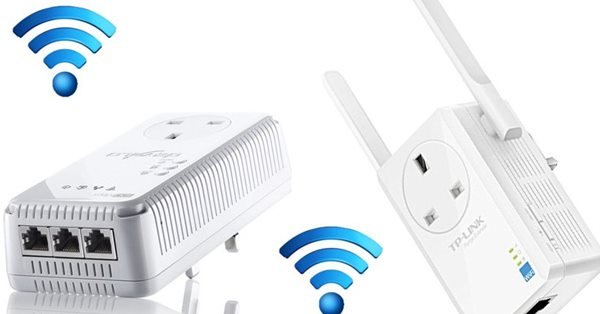
اگر روتری که استفاده میکنید آنتن اضافه دارد، آن را در جهات مختلف حرکت دهید تا بالاترین قدرت را برای سیگنال وایفای دریافت کنید. بهترین حالت برای آنتن روتر، جهت عمودی است چون باعث مسدود شدن امواج الکتریکی که در داخل دستگاه یا سایر روترها هستند نمیشود.
Using the Wifi Analyzer App to Examine Networks
One of my favorite tools on my Kindle and phone is Wifi Analyzer. It is a tool that shows information about Wi-Fi networks in range of the device. I am scheduled to teach Learning Tree’s Introduction to Networking soon, and this is a tool I demonstrate to participants.
Of course, neither this post nor my demonstration of the tool in Learning Tree’s classes implies any endorsement by Learning Tree, nor are the creators of Wifi Analyzer compensating me, Learning Tree or anyone else I know, for that matter.
I use the tool to look for wireless access points (WAPs), check for “dead spaces” in signals, and to look for the best channel on which to locate an access point. I’ve found rogue access points for clients and even helped ensure WAPs were properly configured.
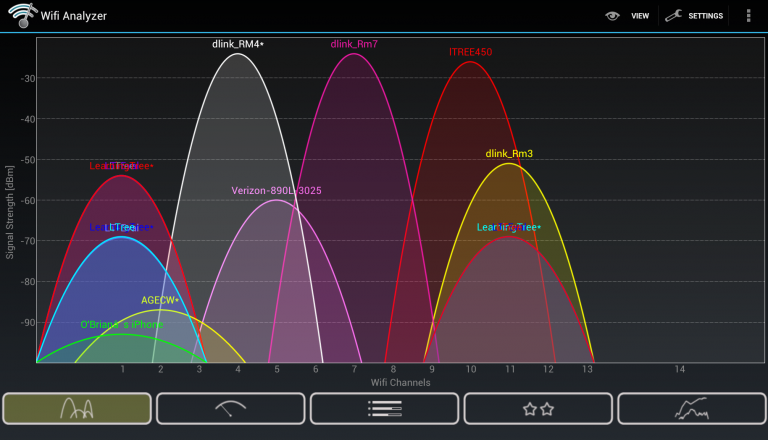
First, let’s look at the display of 2.4GHz channel usage.
In this screenshot, there are thirteen or maybe fourteen access points. There is a good deal of overlap on channel 1, and so some of the names are displayed on top of others. The colors show the individual access points, and the height of the curves indicates signal strength. In a live network, the heights of the shapes would constantly be changing as signal strength varied in real time.
The app also displays signal information for the 5GHz channels.
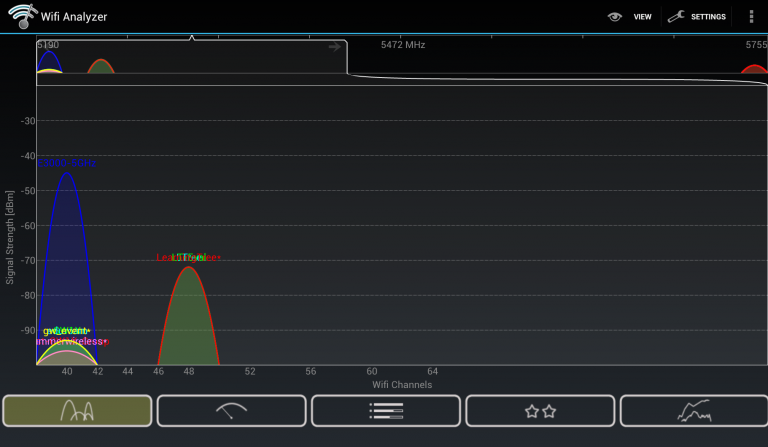
Notice that the devices using 5GHz use channels 40 and 48.
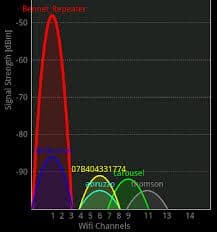
Here is the signal strength when my device is connected to the WAP in my office.
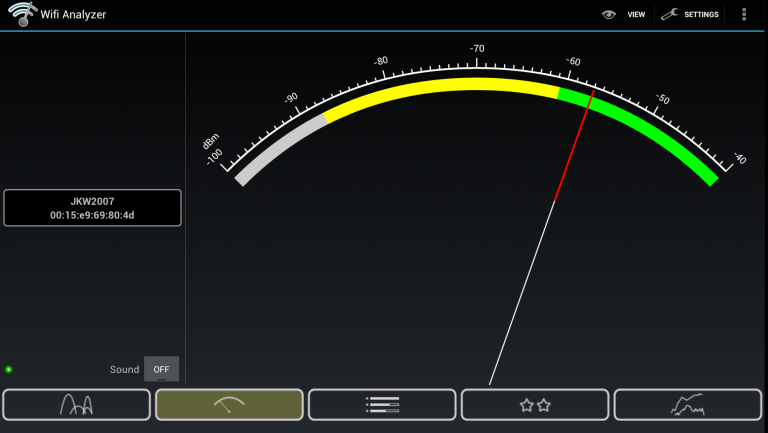
Clearly, this is a strong signal.
The information display shows information about all the visible access points and a bit more about the one to which I am connected.
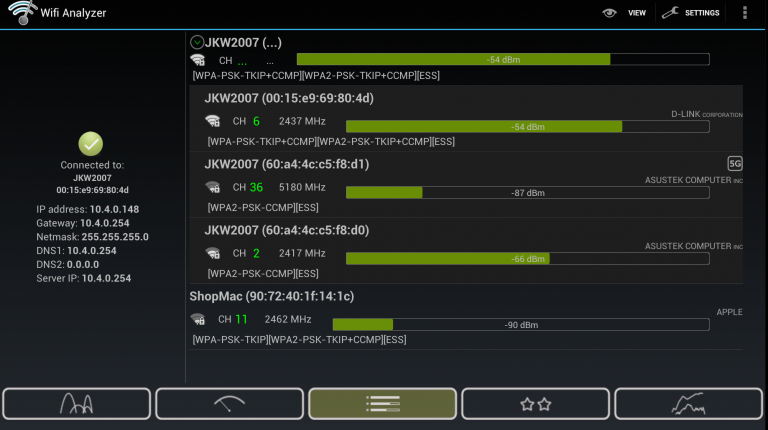
Notice that it shows the channel, signal strength, encryption types available, frequency, and MAC address for each WAP. It also decodes the OUI part of the MAC address to display the manufacturer.
The final display is the signal strength over time.
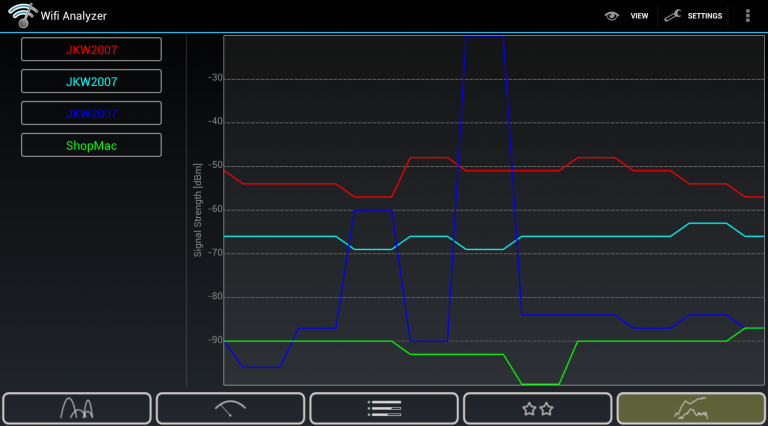
I use this mode when I am doing a simple site survey to see whether or not a WAP is in a location where it can provide a signal to all necessary clients. ShopMac gets a very weak signal at one location where I was walking around, but that’s acceptable to me as it is someone else’s access point.
Wifi Analyzer is not a fancy high-end signal strength measuring device. However, it does take advantage of the hardware capabilities of a device to get reasonably accurate information. Since it is free and runs on my phone, it is more than adequate for all but the most demanding needs.


